As viruses and malware continue to become a threat in the online world, one may find it necessary to check the router’s internet activity to ascertain the people within your network are not accessing potentially harmful websites. It is possible to configure your router in a way that it can keep logs of the user’s browsing history. This guide gives you a detailed insight on how to achieve that.
Keep in mind that accessing other people’s browsing history can be considered a violation of their privacy. Thus, please do not make it a habit of using this method to see what other people are browsing. Instead, use the technique for legitimate activities like keep track of your child’s internet usage or your own.
Why monitoring internet activity on your router is important
Monitoring internet activity through the router gives you the chance to do so discreetly. Furthermore, the computer user would find it hard to stop you from doing so.
The router can keep track of every website accessed, even for users who accessed the website using Incognito Mode. That ensures even those who use such strategies to mask how they use your internet connection can be revealed.
The router enables you to achieve what most third-party parental control programs cannot. With a simple Google search, it is possible to bypass most access controls implemented via third-party apps. That is not the case when it comes to your router.
How to log in to your router
For you to implement internet traffic monitoring through the router, you must first log in to it. The simplest way to access the router’s user interface is through the browser. First, you need to make sure that you are connected to it and know its IP Address.
You can get your router’s IP address by checking its back. This could be something along the lines of 192.168.0.1 as an example.
If you cannot see the IP address, take out your computer/laptop and connect it to the router’s Wi-Fi signals. Launch the Command Prompt (CMD) by searching for it on your PC or Mac.
Type in this command “ipconfig” and click Enter.
You will get a series of results that may be intimidating to those who are less tech-savvy. However, it shows you the IP Address of your laptop or Mac, and the router’s IP Address indicated as Default Gateway.

Once you have this IP Address, use the following steps to log in to the router:
- Launch your browser, preferable Chrome, Microsoft Edge, or Firefox
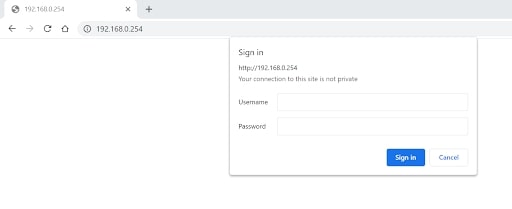
- Type in the IP Address. In this example, it would be 192.168.0.254.
- When the router’s interface loads, input both username and password. You can Google the default credentials for your router model.
- Upon successfully logging in, you are ready to monitor internet activity on the router.

Monitoring user activity
Different routers vary according to the brand and model. However, the reasoning behind monitoring internet activity is the same. What you want to look for is the Log section.
Navigate through the router’s settings until you see Administration. For this page, locate anything that is written Log and choose Enable. The default setting is Disable.
Once enabled, you can be sure the router is keeping track of all internet traffic through it.
To monitor internet activity on your router after enabling Log, first note the device IP address, then check the new logs report generated.


